

If any of you know about this...you will know that this paint job can yield great results if you have the patience and pay attention to detail.
Welp...my car has been five shades of green for quite awhile and its finally getting to me. My only problem was that I was tight on time...so I kinda rushed things..such as taping the seals instead of removing them.
I'm still not completely done, as I'm waiting for my JDM bumper to come in, paint the mirrors and give a final wetsand and polish.
I will say that doing this paint job is damn tedious...I started on Sunday with sanding the car and finished the last coat on Friday. I put on six coats and literally waited almost 24 hours between each coat.
NOW...onto pics (what little I took):
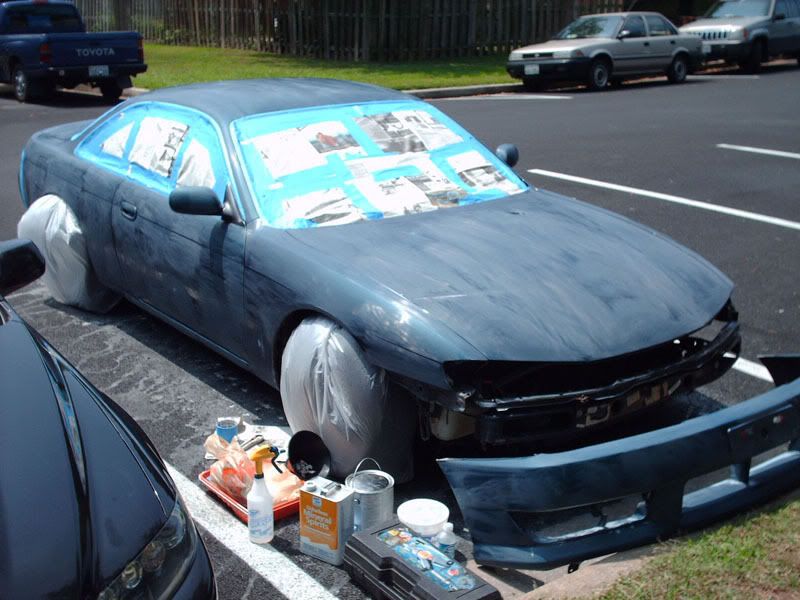
Here is the clearcoat sanded off with 400 grit sandpaper. You can see most of the materials I used for this project:
![Image]()
Here is the first coat.....a classic WTF moment...
![Image]()
Every coat had to be layed down thin...so the first and second coat look horrid.
I don't have a picture of the second coat, but here is a pic of the third coat..you can see the color start to show...
![Image]()
Wetsand the car and layed down the fourth coat. By this time HOA finally jumped on my ass...so I had to move the car to a friend's house to finish it up. Here is the fourth coat...
![Image]()
I missed out on taking a pic of the fifth coat since I was in a rush to get this thing done. Speaking of which...I finished the sixth coat on Friday. As I said before it still needs some work...mainly the rear bumper, mirrors, and wetsand (1000-2000 grit), then polish. This paint takes atleast three months to fully cure...but once it does it will be solid (think of a cast iron tub enamel). I plan on painting the mirrors black and using the enamel spray paint this time around.
Here is the sixth coat:
![Image]()
Once everything is complete I will host a writeup on my website. I recommend this for someone that has time and patience on their side. Also suggest this for someone that has a really bad paint job and doesn't care about winning points at a show.
The paint I used for professional grade Rustoleum enamel. I thinned it out with mineral sprits and rolled it onto the car using a dense foam 4" roller. Sounds ghetto...and yea it actually might be...but for the price I'm not complaining.
Welp...my car has been five shades of green for quite awhile and its finally getting to me. My only problem was that I was tight on time...so I kinda rushed things..such as taping the seals instead of removing them.
I'm still not completely done, as I'm waiting for my JDM bumper to come in, paint the mirrors and give a final wetsand and polish.
I will say that doing this paint job is damn tedious...I started on Sunday with sanding the car and finished the last coat on Friday. I put on six coats and literally waited almost 24 hours between each coat.
NOW...onto pics (what little I took):
Here is the clearcoat sanded off with 400 grit sandpaper. You can see most of the materials I used for this project:
Here is the first coat.....a classic WTF moment...

Every coat had to be layed down thin...so the first and second coat look horrid.
I don't have a picture of the second coat, but here is a pic of the third coat..you can see the color start to show...

Wetsand the car and layed down the fourth coat. By this time HOA finally jumped on my ass...so I had to move the car to a friend's house to finish it up. Here is the fourth coat...

I missed out on taking a pic of the fifth coat since I was in a rush to get this thing done. Speaking of which...I finished the sixth coat on Friday. As I said before it still needs some work...mainly the rear bumper, mirrors, and wetsand (1000-2000 grit), then polish. This paint takes atleast three months to fully cure...but once it does it will be solid (think of a cast iron tub enamel). I plan on painting the mirrors black and using the enamel spray paint this time around.
Here is the sixth coat:
Once everything is complete I will host a writeup on my website. I recommend this for someone that has time and patience on their side. Also suggest this for someone that has a really bad paint job and doesn't care about winning points at a show.
The paint I used for professional grade Rustoleum enamel. I thinned it out with mineral sprits and rolled it onto the car using a dense foam 4" roller. Sounds ghetto...and yea it actually might be...but for the price I'm not complaining.


