Ok - Disclaimer: The Author of this thread is by no means a professional, in fact this is his first FG job EVER.
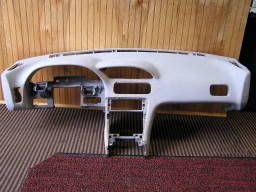
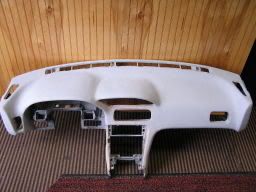
Alright, many of you have seen the dash from my 91 Hatch in my intro pics . I decided early on that it would need some major work. I sat down and came up with a plan - glass it and embed some gauges in the front. So I started by removing the dash and removed ALL of that PITA vinyl.
I am using Evercoat Sea-Glass and Bondo Resin (I Know - :eek4: Cheap Shit) for now until I get a handle on doing this. Then I will get better products. The Sea-Glass is know as chop mat and can be torn apart so it doesn't wrinkle up in he tight spots.
Photoshopped to fill vents:
![Image]()
Close up of where console drop used to be:
![Image]()
Glassing in the pods:
![Image]()
![Image]()
![Image]()
That was yesterday, today I put in the third pod and began filling the vents:
3rd Pod
![Image]()
Vents filled:
![Image]()
![Image]()
![Image]()
The pods will be cut flush for that frenched look . . .:dancingna
I am not sure how long this will take me as I am swamped at work and will be leaving town to do some training out of the country . . . so stay tuned as updates will come as I make progress.
Alright, many of you have seen the dash from my 91 Hatch in my intro pics
. I decided early on that it would need some major work. I sat down and came up with a plan - glass it and embed some gauges in the front. So I started by removing the dash and removed ALL of that PITA vinyl.I am using Evercoat Sea-Glass and Bondo Resin (I Know - :eek4: Cheap Shit) for now until I get a handle on doing this. Then I will get better products. The Sea-Glass is know as chop mat and can be torn apart so it doesn't wrinkle up in he tight spots.
Photoshopped to fill vents:

Close up of where console drop used to be:

Glassing in the pods:


That was yesterday, today I put in the third pod and began filling the vents:
3rd Pod

Vents filled:


The pods will be cut flush for that frenched look . . .:dancingna
I am not sure how long this will take me as I am swamped at work and will be leaving town to do some training out of the country . . . so stay tuned as updates will come as I make progress.