I'm not completely done, Ill post pics as I go along with it, but I have had some people request I put the write up here. So here goes.
Note: This is the way I am doing it, if you have any negative comments keep them to yourself. I have reasoning behind doing it this way.
I am not responsible for you screwing up your own dash because you don't know what your doing. I will be more the happy to help you out the best I can though.
The story: I bought a cage in a shell, the dash was cut out for the cage and it also had a nice crack in it. Well I have a perfect dash sitting in my shop, but why hack that one up? I decided to glass this one over and mount some gauge pods in it. So ifyou have a cracked/cracking dash, I don't see how it could look worse if you at least try this. Expect a lot of filler dust out of this project. Also have prepared a lot of latex gloves.
Tools needed:
-Box of Latex gloves
-Dash(preferably cracked") )
)
-Sharp razor
-Couple liter cans of Fiberglass resin
-extra tubes of hardener
-Fiberglass matting(I prefer the straight mat, not the kind that is all mesh like)
-Paint roller/rollers(I used 2" ones, bought about 10 of them, used about 5 or 6)
-Sandpaper (80, 600grit, also 180grit if you are not going to use an angle grinder)(note: this is how I'm doing it, you'll see why I only am using two kinds)
-a few buckets to pour the resin into.
-Body Filler
-Spreading things (something to spread the filler out on the dash with)
-Acetone
-rags(clean!)
-A block of some sort for sanding, preferably one long, one short..
-Chisel(optional)
-Gauge pods(optional)
-Angle Grinder with sanding wheel(optional, highly recommended though)
-That's all I can think of off the top of my head that I used, if I remember something else Ill edit this.
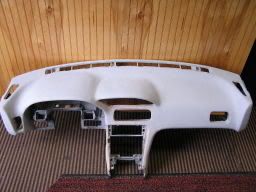
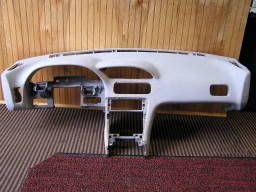
First step: -Remove dash(easy enough, just take it out)and remove all a/c vents and such.
Second step: (Tools needed: chisel, not nessecary, but it helps your nails from hurting haha)
-Observe and start taking vinyl skin off!! Try to peel it away first. You will more than likely end up doing it like me and chipping away at it with a chisel or something to lift it up since it is so dry.
![Image]()
You should get something like this in the end. Notice how the heat got to it.
![Image]()
![Image]()
Step Three: (Tools needed: -Bucket, -Paint Roller with brush thing, -Matting -Resin, -Hardener, -gloves, -A mat to drip the resin on, not required)
Now that you have got all of it stripped down, its time to start glassing. This is where it gets messy. Get some gloves on, you'll be needing them. Pour some resin in a bucket(I just used cool whip containers, filling them about 1/8-1/4 full) Add hardener, I cannot stress enough, it will dry, drying too slow is better than too fast. Get your roller and roll on some resin to a section, dont try to be a badass and do the entire thing in one trip. Now put your mat down, press down on it so it sticks for a couple seconds. Now go back over it with some more resin, making sure it all gets covered. Try to get it contoured to all the curves and such, its kind of hard, but if you can't do it, no big deal. Let dry. Should end up with this:
![Image]()
Notice how there are pieces missing, those are the spots where I said to try to get it fitted, but I was unable to, no big deal. Just get a sharp blade and cut out the spots.
![Image]()
Be a little sloppy, you can reuse a lot of that mat!!!
![Image]()
Step Four: (Tools needed: same as above)
Now all the parts that you cut out just go over again with more matting the same way you did in step three. This time though, use smaller pieces.
![Image]()
![Image]()
Go over the cutting process again and repeat until everything has some mat on it. After this, I went over the entire thing with just a thick layer or resin.
Step Five: (Gauges Pods, if installing)
I wanted to mount my gauges into the dash, so if you want to do the same, here ya go:
Figure out where you want them to do, mark them and make sure they are angled right where you want them:
![Image]()
Get even with the dash to figure out if they are going to be right. I dont know if you can actually measure anything, I just eyeballed it.
![Image]()
Now you got to put some glass over those gauge pods so they stay in place!
I got the strip of mat, its like 2 inches wide, about 4 feet long. Be sure to push it down into the crevices between the gauge pods!!
![Image]()
![Image]()
Now, once again, start hacking away at those extra little pieces of the mat that are not attached to anything.
![Image]()
![Image]()
Now since you only used a strip of the mat to go over the gauge pods, you want to give the back some extra strength. Get some leftover matting somewhere and put it on the back of the pods.
![Image]()
So now that you hacked away at any unneeded matting and stuff, start putting some more resin on there. I put only two THICK layers. It should be relatively shiny when your done:
![Image]()
Let it all dry and cure for at least a night.
Step Six: (Tools needed: 180 grit sandpaper with a sanding block OR an Angle Grinder with Sanding attachment)This is when it starts getting dusty.
LIGHTLY sand down all the surface of the resin. You are trying to give the body filler something to bond to.
I used an angle grinder and lightly went over the entire thing:
![Image]()
Step Seven: (Tools needed: Acetone; Rags, Body Filler, preferably a long sanding block with 80 grit paper, short block and paper will work though too)
Wipe down the entire dash with acetone. Prepare the body filler, remember too little hardener is A LOT better than too much. Work in sections, it will go over a lot better.
Do not use this filler. I accidentally bought the wrong one, it just isn't any good(at least to me.) I used the Bondo Filler: Its black with a black Mustang on the front, blue hardener.
Get the point?
![Image]()
Ok, spread the GOOD filler all over, you will end up with a lot of waves and stuff, this is why you use a block to sand it all out. I have a long block, there like 20 bucks on the net. Good pick up for this project.
This is ALMOST all sanded down. Be prepared for some dust haha
![Image]()
![Image]()
The gauges are tough to get to in between, but with some 80 grit paper, just fold it in half and go to town. Sure it takes time, but you want it to look good right?
![Image]()
Notice the marks still in the back of the guages from the filler? We'll take care of that with sanding and more filler.
That's all I have completed so far. I will update when I progress. If you have any questions, feel free to ask.
Note: This is the way I am doing it, if you have any negative comments keep them to yourself. I have reasoning behind doing it this way.
I am not responsible for you screwing up your own dash because you don't know what your doing. I will be more the happy to help you out the best I can though.
The story: I bought a cage in a shell, the dash was cut out for the cage and it also had a nice crack in it. Well I have a perfect dash sitting in my shop, but why hack that one up? I decided to glass this one over and mount some gauge pods in it. So ifyou have a cracked/cracking dash, I don't see how it could look worse if you at least try this. Expect a lot of filler dust out of this project. Also have prepared a lot of latex gloves.
Tools needed:
-Box of Latex gloves
-Dash(preferably cracked
)-Sharp razor
-Couple liter cans of Fiberglass resin
-extra tubes of hardener
-Fiberglass matting(I prefer the straight mat, not the kind that is all mesh like)
-Paint roller/rollers(I used 2" ones, bought about 10 of them, used about 5 or 6)
-Sandpaper (80, 600grit, also 180grit if you are not going to use an angle grinder)(note: this is how I'm doing it, you'll see why I only am using two kinds)
-a few buckets to pour the resin into.
-Body Filler
-Spreading things (something to spread the filler out on the dash with)
-Acetone
-rags(clean!)
-A block of some sort for sanding, preferably one long, one short..
-Chisel(optional)
-Gauge pods(optional)
-Angle Grinder with sanding wheel(optional, highly recommended though)
-That's all I can think of off the top of my head that I used, if I remember something else Ill edit this.
First step: -Remove dash(easy enough, just take it out)and remove all a/c vents and such.
Second step: (Tools needed: chisel, not nessecary, but it helps your nails from hurting haha)
-Observe and start taking vinyl skin off!! Try to peel it away first. You will more than likely end up doing it like me and chipping away at it with a chisel or something to lift it up since it is so dry.

You should get something like this in the end. Notice how the heat got to it.


Step Three: (Tools needed: -Bucket, -Paint Roller with brush thing, -Matting -Resin, -Hardener, -gloves, -A mat to drip the resin on, not required)
Now that you have got all of it stripped down, its time to start glassing. This is where it gets messy. Get some gloves on, you'll be needing them. Pour some resin in a bucket(I just used cool whip containers, filling them about 1/8-1/4 full) Add hardener, I cannot stress enough, it will dry, drying too slow is better than too fast. Get your roller and roll on some resin to a section, dont try to be a badass and do the entire thing in one trip. Now put your mat down, press down on it so it sticks for a couple seconds. Now go back over it with some more resin, making sure it all gets covered. Try to get it contoured to all the curves and such, its kind of hard, but if you can't do it, no big deal. Let dry. Should end up with this:

Notice how there are pieces missing, those are the spots where I said to try to get it fitted, but I was unable to, no big deal. Just get a sharp blade and cut out the spots.

Be a little sloppy, you can reuse a lot of that mat!!!

Step Four: (Tools needed: same as above)
Now all the parts that you cut out just go over again with more matting the same way you did in step three. This time though, use smaller pieces.


Go over the cutting process again and repeat until everything has some mat on it. After this, I went over the entire thing with just a thick layer or resin.
Step Five: (Gauges Pods, if installing)
I wanted to mount my gauges into the dash, so if you want to do the same, here ya go:
Figure out where you want them to do, mark them and make sure they are angled right where you want them:

Get even with the dash to figure out if they are going to be right. I dont know if you can actually measure anything, I just eyeballed it.

Now you got to put some glass over those gauge pods so they stay in place!
I got the strip of mat, its like 2 inches wide, about 4 feet long. Be sure to push it down into the crevices between the gauge pods!!


Now, once again, start hacking away at those extra little pieces of the mat that are not attached to anything.


Now since you only used a strip of the mat to go over the gauge pods, you want to give the back some extra strength. Get some leftover matting somewhere and put it on the back of the pods.

So now that you hacked away at any unneeded matting and stuff, start putting some more resin on there. I put only two THICK layers. It should be relatively shiny when your done:

Let it all dry and cure for at least a night.
Step Six: (Tools needed: 180 grit sandpaper with a sanding block OR an Angle Grinder with Sanding attachment)This is when it starts getting dusty.
LIGHTLY sand down all the surface of the resin. You are trying to give the body filler something to bond to.
I used an angle grinder and lightly went over the entire thing:

Step Seven: (Tools needed: Acetone; Rags, Body Filler, preferably a long sanding block with 80 grit paper, short block and paper will work though too)
Wipe down the entire dash with acetone. Prepare the body filler, remember too little hardener is A LOT better than too much. Work in sections, it will go over a lot better.
Do not use this filler. I accidentally bought the wrong one, it just isn't any good(at least to me.) I used the Bondo Filler: Its black with a black Mustang on the front, blue hardener.
Get the point?

Ok, spread the GOOD filler all over, you will end up with a lot of waves and stuff, this is why you use a block to sand it all out. I have a long block, there like 20 bucks on the net. Good pick up for this project.
This is ALMOST all sanded down. Be prepared for some dust haha


The gauges are tough to get to in between, but with some 80 grit paper, just fold it in half and go to town. Sure it takes time, but you want it to look good right?

Notice the marks still in the back of the guages from the filler? We'll take care of that with sanding and more filler.
That's all I have completed so far. I will update when I progress. If you have any questions, feel free to ask.