Nissan 240SX Forums banner

Zenki Projector Headlight Retrofit

31K views 40 replies 15 participants last post by  RikRong  
#1 ·
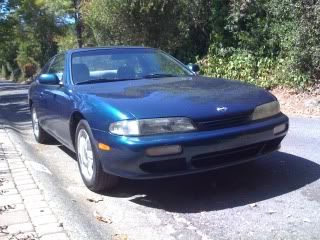
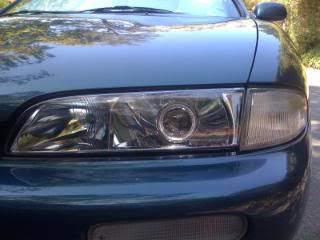
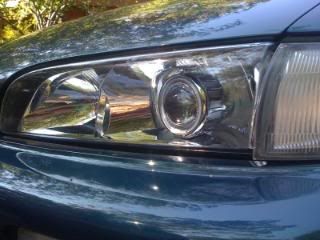
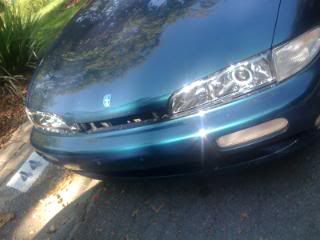
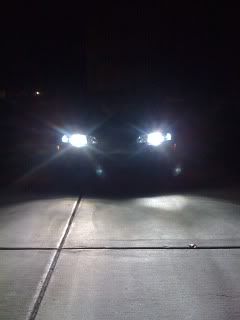
Hey guys! just want to show my new retrofit Projector lights on my Zenki.
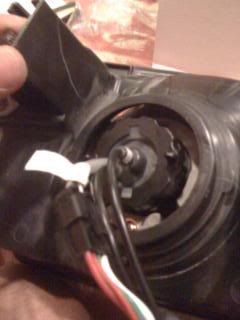
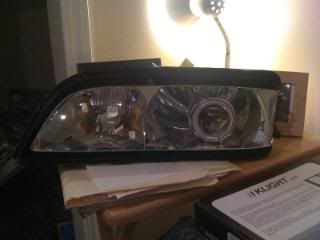
Since there are no aftermarket projector's headlight kit for Zenki (damn you kouki's! LoL) i decided to go retrofit. It was a lot easy to pry than my celica headlight before so i finished it quite fast. I did stumble some problems with the clear lens cover because it wasn't a direct replacement like it says when you buy it. But anyway i like the results so hope you guys like it too.
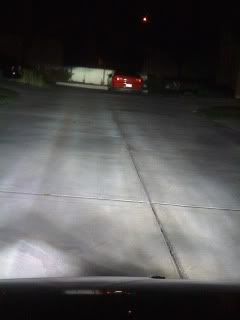
Here are the pictures.
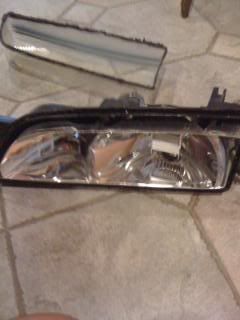
Old Headlights
Image

Image

Image

Image

Image

Image

Image

Image

Image
 
#3 ·
Very nice. Seems easier than a lot that I've seen. What projectors did you use? And you should get crystal corner lights, running lights, and side markers.
 
#5 ·
thanks! im glad that you guys liked it... yeah it was really simple to do, the hard part is just the prying the cover off. After that its all a breeze. Oh! the best part is the HID kit that i got. Its a Projector kit itself for retrofitting your headlight. I got it in ebay for a good price. Just search for HID Projector Kit and it will show up, the kit that i got only had the projector, bulb and controller for high-beam Bi-Xenon. When you order just tell them the bulb size and color of the halos that you want. Bling!!!!! 5-7 days you'll get it...
 
#6 ·
Oh wow. Ebay actually delivers. It looks good, I figured I might as well grab this since I'm going to be replacing the stock headlight cover with a clear cover anyways. You should do a write up so we can all see how exactly it's done! :thumbsup
 
#7 ·
Well that's good that you are going to replace it with clear covers, but that's were i had to figure on how to seal it. because it is not a direct replacement like the OEM where you will just push it in back and use the 4 clips. Its not. I was kind of pissed because i didn't expect it to be like that, i mean yeah its nice and clear but the fitment is worst! so in order for the water not going inside i used clear silicone around instead of those sticky black seals.
 
#8 · (Edited)
Alright here's what i did when i retrofitted my headlight.

Tools:
Screwdrivers (+ / - )
Heat gun
Electrical Tape
Long Nose Pliers
10mm Socket wrench
Caulking Gun
Clear Silicone

1: Take off the headlights, i would suggest take both left and right because this will be a easy installation after prying the cover off. Take off the top screw that's holding the side markers and gently pull it forward and once it pops the ball that is connected with the Headlight housing gently slide it out. Now you can see the two nuts use 10mm socket to take it off. Now take off the center grill between the two headlight two screws on top and on the bottom, pulling it off is a pita!!!! i used the flat screw driver to pop it up. Now take off the last two screws that's holding the headlight.

2. Use the heat gun to soften the seals inside the headlight cover. Point the tip of the gun at least 3 inch, you dont want it too close as it will deform the plastic. Now i would suggest to start heating the top part and slowly make your way around. Once the cover is hot enough that your finger can't touch it use the flat screw driver to pry it, now its not going to go off in one heating, if you successfully pry the top part keep that area hot as possible.

3. When you pry open the headlight take off the two screws inside the housing so you can put in the Projector kit. Follow the instructions that came with the kit and your all done!!!! All you have to do is heat up the black seal from the housing and press them back together! Or if your using clear covers take off the old black seal by heating them up then scrape them off. When done use the Clear silicone to seal the clear covers, i suggest use some plastic card like old credit cards to make the silicone clean and even by scraping on the sides. To make it better looking and hide the clear silicone wrap a electrical tape around the housing just to cover the silicone.
 
#20 ·
Yeah that's the one that i used. And sorry for the delay of the picture, busy week and im having trouble with camera so i just used iphone for camera. for the angel eye you dont have to hook it up if you dont want them. Here are the pics, one facing the car and the road. Oh! one more thing you will need to re-adjust the angle of the light and highly recommend clear covers.
Image

Image
 
#21 ·
Wow, that cut off looks really good, These are D2S's right?

Pair this up w/ a Good High quality 55w set-up and you got yourself some nice light output

More pics of the Headlights during the day? (Bigger)
Not sure if I like how it looks though thats the only thing...
 
#22 ·
^^^ i'll just borrow my friends camera so i can get bigger and better picture... For looks yeah it wont be as fancy like retrofit from tsx projector but the installation is like feeding a bottle on a baby! So easy and no cutting!!! My friends like it, some of them say i should put shroud it could look better. But hey i liked it! so what the heck make your own LoLz....
 
#24 ·
The projector will be snug fit and fix. Once you open your headlight you will put it in and screw it just like installing a Halogen bulb but in the other way. And not using a clip to hold it instead a set of screw and washer for a very nice fit and clean looking. Trust me this is 100% times better than putting TSX light and cutting the shroud. Well if you want a better looking you can create your shroud for this projector. But this thing works fine for me so its ok for now.
 
#25 ·
so it just goes through the front and then you twist it in place as if you were just replacing the bulb itself? Thats kinda cool i wish i would have found these before i did the s2000 retro it would have been so much nicer. Can you still adjust the headlight like you would normally?