

This is a placeholder for my full write up. I'm going to put the notes in first, then add my pics in future edits.
Why?
The factory coil packs, and the various generic replacements, have problems with higher hp applications. The problem seems to occur around 17psi and higher. The coil packs don't generate enough spark for a good burn, and the only way to get your spark plugs to stay lit is to gap them extremely small. This, of course, reduces the quality of the burn and the overall performance of the vehicle can be compromised. Some solutions, including putting tape or liquid tape around the coil packs to prevent arcing do not solve this problem, as those are not true solutions for high HP applications. Instead of putting my faith in other replacement coil packs, such as the split fires, I have decided to upgrade to a significantly better coil pack... The LS2 Truck Coil.
What do you need?
For starters, an ECU you can modify is preferable. (I used AEM EMS).
You want to get the LS2 truck coil packs. These are near plug coils, so they don't sit directly on top of your spark plugs. The difference between the standard LS2 and LS2 truck coils is that the truck coils are actually a little more powerful and have a built in heat sink on top, which is great for high hp applications. You can also get the standard LS2 coils (Corvette) if you want, but why not go for the best?
![Image]()
You will also need the delpi 4-prong connector plugs that fit these coil packs.
You can get these from Haltech, EBay, or probably a GM parts department. I couldn't find them at places like Autozone or Napa.
Part# GM IGNITION COIL CONNECTOR TRUCK D581 D585 LS2 SET OF 6 -- (If you get them with the wires already pinned then you can save about 30 minutes on your wiring process.)
![Image]()
And you need some new spark plug cables! I picked mine up at Napa. If you need a vehicle to search, get the truck version (Cadillac Escalade works well in the lookup). You want to make sure they are long enough to reach your installation location. These barely reach mine and they are snug.
Part # BEL 700399
![Image]()
And finally, here is the part where you'll need to be creative. Since this is a coil near plug setup, you can't just place them in the factory location. Also, they are too big to fit down in the valley where your old coil packs went. Therefore you need a place to mount them. I've seen people make mounts off to the side or by the firewall and then run longer cables to the spark plugs. That's an option. For my solution I went with a custom coil pack cover. The coil packs actually mount on top of the cover and the cables go through the cover, down to the spark plugs below. This keeps it clean down there and allows the heat from the coil packs to not be trapped by the cover (most of us run without the cover anyways, right?).
If you want this piece, I know a guy that can make them (around $200). If you have basic fabrication skills you can mock this up yourself.
![Image]()
Additional tools / accessories that you'll want to have handy:
Let's get started!
The first thing you'll want to do is unplug your coilpacks from the sub-harness, and then unplug the sub-harness from the main harness. This is an 8 pin plug that sits just behind your engine and to the left.
![Image]()
Once you have this removed you can go to your work bench and start the wiring process.
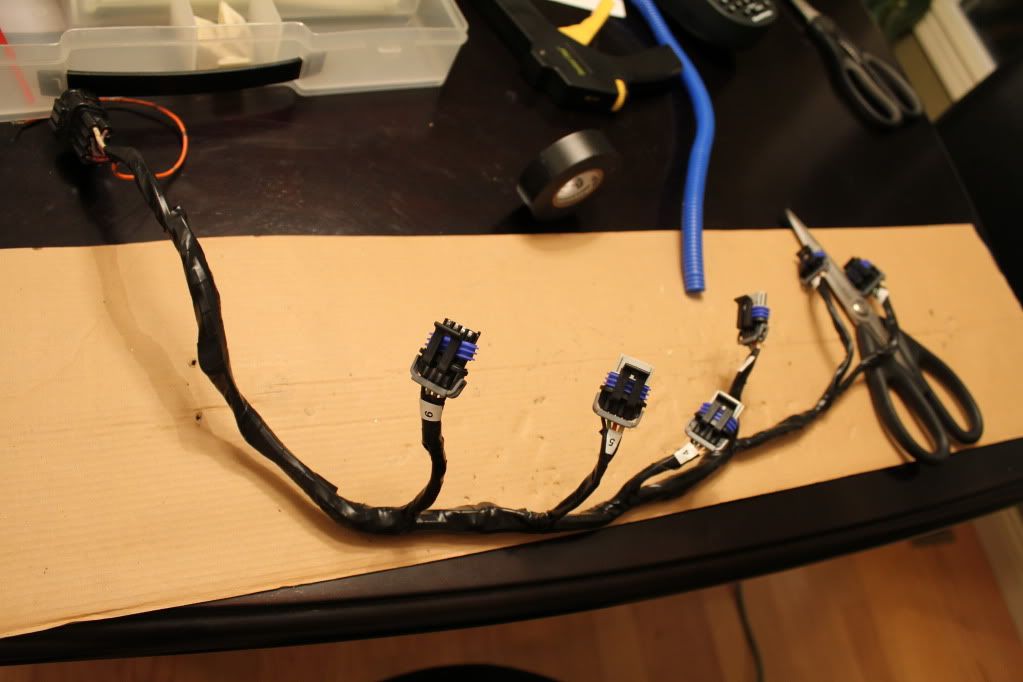
1. You want to keep the 8 ping plug in-tact, but you will need to remove the individual plugs for each coilpack from your factory harness. You can take the time to depin them (pop-up the yellow piece in front and then individually remove each pin), or you can cut the wires as close as possible to the actual plugs.
![Image]()
It's important to note that even if you take the time to de-pin the original plugs, you'll have to remove the pins because they don't fit in the new delphi plugs. =)
Once you have the original plugs off, you'll want to put the new pins on the 3 wires per plug. These just crimp on, but if you want to hit them with a touch of solder be careful not to put a big glob on there or they won't easily slide into the new delphi plugs (I made this mistake on one of them and had to use a solder removal tool to clean it up).
![Image]()
Now is the time to inspect the original harness wiring. I removed all of the protective tape / covers / wire loom on the original harness to get it down to just the wires. I noticed a small nick in my ground wire (could have been caused by me?). If you see any issues, REPAIR THEM. That's what the solder and heat shrink tubing is for. I also didn't like the way they clipped my power wire together, so I put some solder on that as well.
![Image]()
![Image]()
Now comes the fun part.
You need to take your 16awg wire (preferably black) and make a new ground wire that matches the original harness. I used spare wire from an old harness for my first attempt at this, so it's green with an orange lead (clown wires). You'll want to leave your wire a bit longer at the end where your factory plug is because you are going to ground it to the engine/chassis. I grounded mine on the back left bolt for my left valve cover.
![Image]()
![Image]()
Once you have this wired up, you tape it up real good with the original harness.
![Image]()
Once you have your new 4-wire harness completed you'll need to put the pins into the plugs.
If you're looking at the back of the plug where you put the wires in, with the clip on top... This is the order:
Original Harness Ground = Black Wire
New ground = this is the one you spliced in just now
5v signal = Pink wire with colored stripe
12v power = larger white wire
Please note that the pink signal wires are in a specific order so that the coils fire at the right time! Don't mix those up.
The pins should just slide in / snap into place. Then you push the front white clip down snug, and snap the back plastic plug into place to seal it up.
Note - I did have a little trouble with the larger power wire sliding into the connector. You'll need to use a small tool to push it in until it snaps.
![Image]()
Once your wire is complete and taped up, go ahead and put your split loom around it and use tape and/or zip ties to get it good and snug. You want to protect these wires as best a possible.
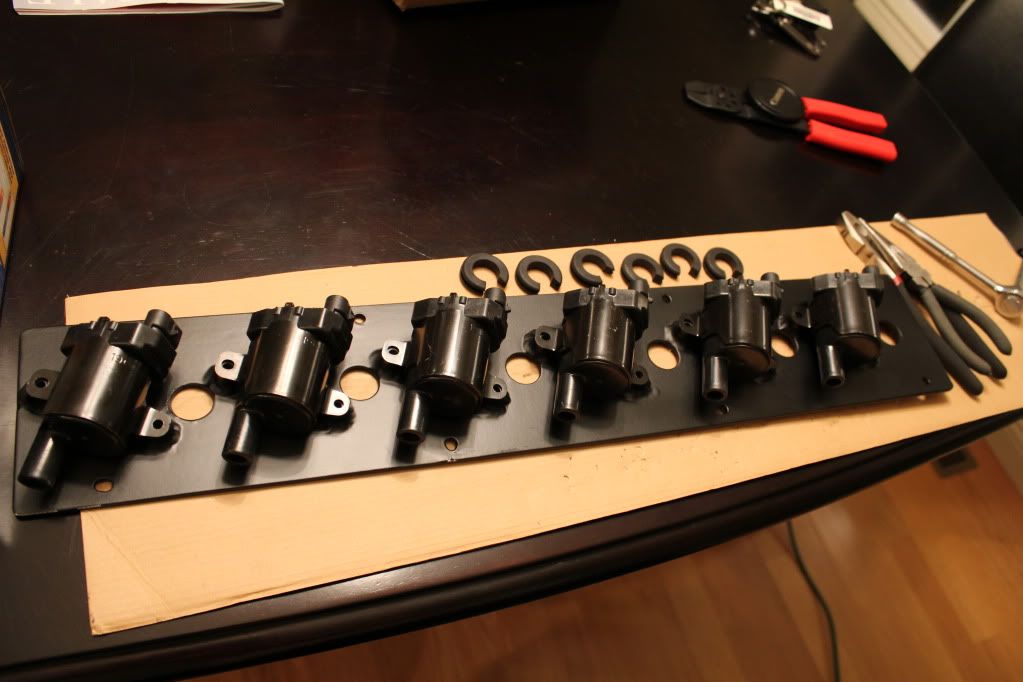
Now is the time to mock up your new coil packs and the mounting bracket. Here I have used my custom cover.
![Image]()
Once these are bolted down and secured, take the plate, your harness, and the spark plugs to the vehicle and get them situated.
I found it was easiest to plug in the spark plug cables first, then drape them through my plate, screw the plate down, and then plug in the wires to the coil packs. Then I attached my harness (don't forget the extra ground).
Don't start the car yet! Get the power on and adjust your ECU to allow for the new coils. I use the AEM EMS, so it has a wizard under ignition for choosing the coil packs. I selected the LS2 coil packs. Then I started the car and checked the timing (it can shift). After verifying timing I took the car for a spin and enjoyed the awesome new LS2 Truck coils!
On my car, I had to go in and adjust my fuel map by about 10% because of the increased burn I was getting from the new coil packs. You may notice your setup running a little lean. If so, be prepared to adjust it to be safe.
![Image]()
Many thanks to the following resources:
http://forums.nicoclub.com/rb-engine-coil-retrofit-t219934-80.html
http://www.megamanual.com/seq/coils.htm
Why?
The factory coil packs, and the various generic replacements, have problems with higher hp applications. The problem seems to occur around 17psi and higher. The coil packs don't generate enough spark for a good burn, and the only way to get your spark plugs to stay lit is to gap them extremely small. This, of course, reduces the quality of the burn and the overall performance of the vehicle can be compromised. Some solutions, including putting tape or liquid tape around the coil packs to prevent arcing do not solve this problem, as those are not true solutions for high HP applications. Instead of putting my faith in other replacement coil packs, such as the split fires, I have decided to upgrade to a significantly better coil pack... The LS2 Truck Coil.
What do you need?
For starters, an ECU you can modify is preferable. (I used AEM EMS).
You want to get the LS2 truck coil packs. These are near plug coils, so they don't sit directly on top of your spark plugs. The difference between the standard LS2 and LS2 truck coils is that the truck coils are actually a little more powerful and have a built in heat sink on top, which is great for high hp applications. You can also get the standard LS2 coils (Corvette) if you want, but why not go for the best?

You will also need the delpi 4-prong connector plugs that fit these coil packs.
You can get these from Haltech, EBay, or probably a GM parts department. I couldn't find them at places like Autozone or Napa.
Part# GM IGNITION COIL CONNECTOR TRUCK D581 D585 LS2 SET OF 6 -- (If you get them with the wires already pinned then you can save about 30 minutes on your wiring process.)

And you need some new spark plug cables! I picked mine up at Napa. If you need a vehicle to search, get the truck version (Cadillac Escalade works well in the lookup). You want to make sure they are long enough to reach your installation location. These barely reach mine and they are snug.
Part # BEL 700399

And finally, here is the part where you'll need to be creative. Since this is a coil near plug setup, you can't just place them in the factory location. Also, they are too big to fit down in the valley where your old coil packs went. Therefore you need a place to mount them. I've seen people make mounts off to the side or by the firewall and then run longer cables to the spark plugs. That's an option. For my solution I went with a custom coil pack cover. The coil packs actually mount on top of the cover and the cables go through the cover, down to the spark plugs below. This keeps it clean down there and allows the heat from the coil packs to not be trapped by the cover (most of us run without the cover anyways, right?).
If you want this piece, I know a guy that can make them (around $200). If you have basic fabrication skills you can mock this up yourself.

Additional tools / accessories that you'll want to have handy:
- Wire cutters
- Wire stripper
- Crimp tool
- Electrical tape
- Heat Shrink Tubing
- Solder
- Soldering Gun
- hookup wire (I used 12awg for my power and 16awg for others)
- Split loom
- Labelmaker / labels (optional)
- Zip ties
- Scissors (for electrical tape)
- patience
Let's get started!
The first thing you'll want to do is unplug your coilpacks from the sub-harness, and then unplug the sub-harness from the main harness. This is an 8 pin plug that sits just behind your engine and to the left.

Once you have this removed you can go to your work bench and start the wiring process.
1. You want to keep the 8 ping plug in-tact, but you will need to remove the individual plugs for each coilpack from your factory harness. You can take the time to depin them (pop-up the yellow piece in front and then individually remove each pin), or you can cut the wires as close as possible to the actual plugs.

It's important to note that even if you take the time to de-pin the original plugs, you'll have to remove the pins because they don't fit in the new delphi plugs. =)
Once you have the original plugs off, you'll want to put the new pins on the 3 wires per plug. These just crimp on, but if you want to hit them with a touch of solder be careful not to put a big glob on there or they won't easily slide into the new delphi plugs (I made this mistake on one of them and had to use a solder removal tool to clean it up).

Now is the time to inspect the original harness wiring. I removed all of the protective tape / covers / wire loom on the original harness to get it down to just the wires. I noticed a small nick in my ground wire (could have been caused by me?). If you see any issues, REPAIR THEM. That's what the solder and heat shrink tubing is for. I also didn't like the way they clipped my power wire together, so I put some solder on that as well.


Now comes the fun part.
You need to take your 16awg wire (preferably black) and make a new ground wire that matches the original harness. I used spare wire from an old harness for my first attempt at this, so it's green with an orange lead (clown wires). You'll want to leave your wire a bit longer at the end where your factory plug is because you are going to ground it to the engine/chassis. I grounded mine on the back left bolt for my left valve cover.


Once you have this wired up, you tape it up real good with the original harness.
Once you have your new 4-wire harness completed you'll need to put the pins into the plugs.
If you're looking at the back of the plug where you put the wires in, with the clip on top... This is the order:
Original Harness Ground = Black Wire
New ground = this is the one you spliced in just now
5v signal = Pink wire with colored stripe
12v power = larger white wire
Please note that the pink signal wires are in a specific order so that the coils fire at the right time! Don't mix those up.
The pins should just slide in / snap into place. Then you push the front white clip down snug, and snap the back plastic plug into place to seal it up.
Note - I did have a little trouble with the larger power wire sliding into the connector. You'll need to use a small tool to push it in until it snaps.

Once your wire is complete and taped up, go ahead and put your split loom around it and use tape and/or zip ties to get it good and snug. You want to protect these wires as best a possible.
Now is the time to mock up your new coil packs and the mounting bracket. Here I have used my custom cover.
Once these are bolted down and secured, take the plate, your harness, and the spark plugs to the vehicle and get them situated.
I found it was easiest to plug in the spark plug cables first, then drape them through my plate, screw the plate down, and then plug in the wires to the coil packs. Then I attached my harness (don't forget the extra ground).
Don't start the car yet! Get the power on and adjust your ECU to allow for the new coils. I use the AEM EMS, so it has a wizard under ignition for choosing the coil packs. I selected the LS2 coil packs. Then I started the car and checked the timing (it can shift). After verifying timing I took the car for a spin and enjoyed the awesome new LS2 Truck coils!
On my car, I had to go in and adjust my fuel map by about 10% because of the increased burn I was getting from the new coil packs. You may notice your setup running a little lean. If so, be prepared to adjust it to be safe.

Many thanks to the following resources:
http://forums.nicoclub.com/rb-engine-coil-retrofit-t219934-80.html
http://www.megamanual.com/seq/coils.htm


