Nissan 240SX Forums banner
2,341 - 2,360 of 3,015 Posts
Discussion starter · #2,344 ·
Looking good man. Can't wait to see you finish up the KA-T
thanks :)


i cant wait either! the quicker i come up with 500 the faster i can install lol

unreal is accepting donations! pm me for details ;)
 
Discussion starter · #2,346 ·
Wish I could help, but i need to replace the leaking power steering rack :(
:hellno:

unreals parts > Monkichi's parts :gc-smiley-sign-i-ag


;)


I have a few pics (too lazy to upload right now) of my boost gauge 90% mounted in the ATI gauge pod. I still have to do modifications to fit the backlight bulb, and modify the left side pod to fit the wideband. Dremel with a drill bit and a stepped stone bit help a TON! :rockon. I can tell the wideband is going to need a lot of dremeling in the rear of the pod to fit. All those damn wires! :(
 
Time to get better gauges :p Lol. Autometers are so damn big.

And better hurry up, hate to have my car get done before you ;)
 
Discussion starter · #2,349 ·
Time to get better gauges :p Lol. Autometers are so damn big.

And better hurry up, hate to have my car get done before you ;)
Lol the price i pay for a mechanical gauge, and the ginormous fitting i got. Plus i fully expected the ati pod to need some dremeling to fit the gauges ;)


Speaking of which:


Image

Image

Image

Image

Image


Turned out pretty good. Boost gauge side needed some love to fit everything, but nothing out of the ordinary. Wideband side was suprisingly easy. I just had to make the rear hole slightly larger to fit the wiring, and the wideband slid right in. The bolts behind the wideband were too short to use the supplied thumb screws, but the gauge fits PERFECTLY in the pod. It has this rubber-ish texured surface behind the face of the gauge thats slightly tapered, so itfits like a well measured shoe. No mounting hardware needed :rockon
 
Discussion starter · #2,351 ·
Not supposed to need hardware with either :p Better get movin!
Theres no way to mount the boost gauge in the pod without the hardware. Although i did not use the mounting bracket. I love how the wideband slid in tho.


Mini update:

Image


Fuck the HKS snap ring. Stupid whore. Took me a combined 3 hours to get this bitch in. Tip for those trying to install the SSQV on its flange:

1. Buy the HEAVY DUTY snap ring pliers from Autozone (Part# 25356). The regular duty ones will bend the tips from the force required to compress the ring.

2. set them to 45* position

3. Put the O-Ring in the flange

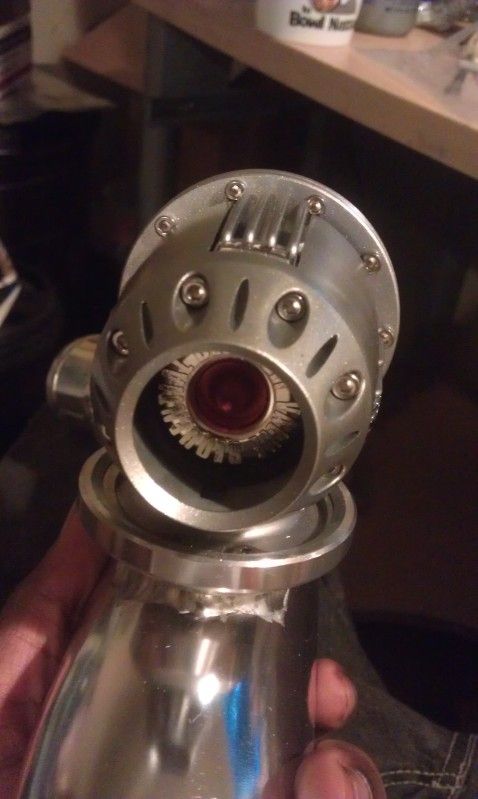
4. Remove the front Cover of the SSQV (4 2.5mm allen key bolts) Starting from 12 o clock, and going clock wise, its every other bolt. This gives you a TON of room to get the pliers in. Its pretty much impossible without doing so. I tried. :(

5. Slide the Snap ring around the BOV. Get a good angle on the pliers and squeeze it slowly, compressing the ring. If you have a good grip on the ring (it will take a few tries and a lot of cursing) you can move it into position with your fingers without the pliers coming off. Make sure the snap ring is on with the beveled edge facing up.

6. Take a flat head or pencil and poke the snap ring around its perimeter to ensure that it is seated properly. When it is in properly, the BOV should NOT move much unless you put some force in it. If it moves without much force, double check that you put the rubber o-ring in, and the snap ring is installed correctly.


In the pic i took off the fin insert, so i wont get that "typical SSQV ricer" sound. It will just be a nice PSSHHT sound :rockon
 
The insert changes the sound, and if you check the thread more...it's not running yet. Or even installed.
 
Discussion starter · #2,355 ·
Thats what she said. :giggle:
:gc-smiley-sign-i-ag

removing the front cover changes the sound? also if its for a ka24de can you post pics of where you ran the bov to the vacuum line and how
The chrome insert changes the sound (like boostin says below) and yes, you can run it without any insert without ill effects. As to the second part of your question, im going to run a vac line from the BOV directly to a JGS vaccum block mounted on the brake booster line. I figure direct vacuum (no tee's) will ensure quicker response. Same with my boost gauge.

The insert changes the sound, and if you check the thread more...it's not running yet. Or even installed.
:gc-smiley-sign-i-ag

Im saving for the enthalpy tune, and then i can get all this stuff installed :idea:
 
Soooo. Decided I will indeed sell you the skirts. No BS, no games. And at a great price too. Only 2 stipulations:
Must pickup
Must also buy my Ti-C so I can swing a new exhaust
 
Discussion starter · #2,357 ·
Soooo. Decided I will indeed sell you the skirts. No BS, no games. And at a great price too. Only 2 stipulations:
Must pickup
Must also buy my Ti-C so I can swing a new exhaust
1. Pickup can be arranged.
2. No need for TIC, i <3 my Blitz :)


(mini update: emailed martin@enthalpy, going to order my ECU this Thursday. Should have all the parts i need by next week. Post #2337 updated)
 
Discussion starter · #2,358 ·
ECU paid for, got 10ft of 5/16 and 3/8 hose for the coolant lines to the turbo. All thats left is the miata battery (or similar) and install $
 
RoTM still needs updating.


And are we racing to finish the swaps 100% now? :p Started playing with my software today :D
 
Discussion starter · #2,360 ·
RoTM still needs updating.


And are we racing to finish the swaps 100% now? :p Started playing with my software today :D
Your face needs updating :p


and no, we are totally not racing to finish the swaps. You'll definitely be done before me. Im aiming for installation during the week of the 25th. Unless i somehow get a decent amount of money before then. Im pretty broke now after buying that ECU/Hoses/Hose barb adapters.


Time to prostitute :(


Im trying to find a cheaper alternative to the miata battery, since the Autozone one is around 130$. Im tempted to snag a lawn and garden battery for the summer to get things going...
 
2,341 - 2,360 of 3,015 Posts